


WPML All Import Plugin Addon 2.2.0
₹299.00
| Features | 9.4 |
|---|---|
| Pricing | 9.5 |
| User Friendly | 9.3 |
| Support | 9.4 |
- You’ll Receive the Original Product with GPL License!
- Exact Same Files Being Distributed By Developer WPML
- We Purchase And Download From Original Authors
- This product is Pre-Activated for your domain
- 100% Free From Virus / Malicious Script / Backdoor
- Standard Support From Our In-House Experts(Free/Paid)
- Product Version: v2.2.0
- Previous versions available: on request
- Use On Unlimited Own & Client Websites
- 1 Year Of Free Updates
- Product Last Updated: Sep 25, 2020
- Developer: WPML
- Demo Link: https://wpml.org/documentation/related-projects/wpml-all-import-plugin-website-import-with-wpml/
Related Products


Ansefy GPL Download – WPML All Import Plugin Add-on 2.2.0 allows you to import posts, pages, WooCommerce products, and other custom post types in bulk from CSV files. You can also import content in multiple languages. You can download the WPML All Import Plugin Addon 2.2.0 by wpml with the gpl license key free and non nulled free or non-crack free latest version file.
Required Plugins
To import multilingual content, you need to have the following installed:
- WP All Import plugin
- WPML – We recommend the Multilingual CMS version.
- WPML All Import add-on (available from your WPML Downloads page)
* If you want to import WooCommerce products, you will also need WooCommerce Import Add-On Pro.
How to import your multilingual content
It’s important to follow this exact process when importing posts, pages, and WooCommerce products:
- Prepare your CSV files for importing
- Add a unique identifier
- Create your taxonomies in WordPress
- Import the default language file
- Import the secondary language file
This article also covers:
- Importing WooCommerce products
- Importing WooCommerce products with prices in other currencies
- Exporting posts
- Importing a custom database design into WordPress
Preparing your CSV files
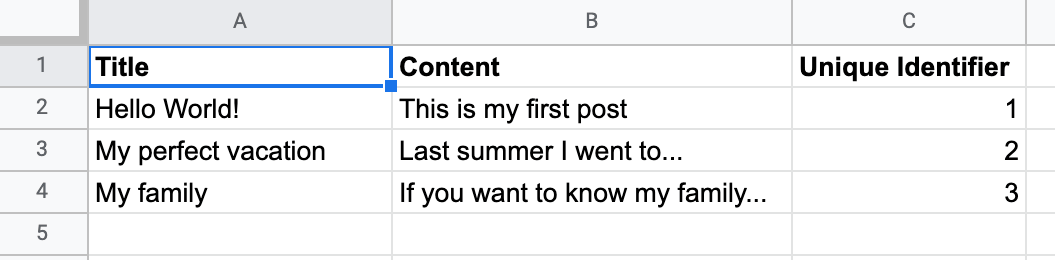
Create a spreadsheet to contain your default language post titles and content, and save it as a CSV file. Give it a meaningful filename, as this will help identify the file from a list later in the process: You can download the WPML All Import Plugin Addon 2.2.0 by wpml with the gpl license key free and non nulled free or non-crack free latest version file.
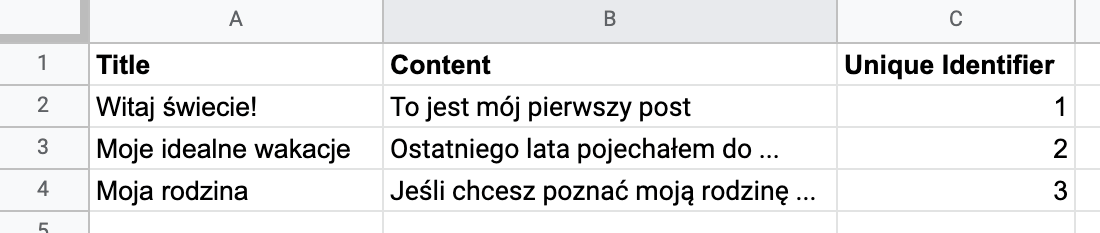
Prepare separate spreadsheets for each additional language:
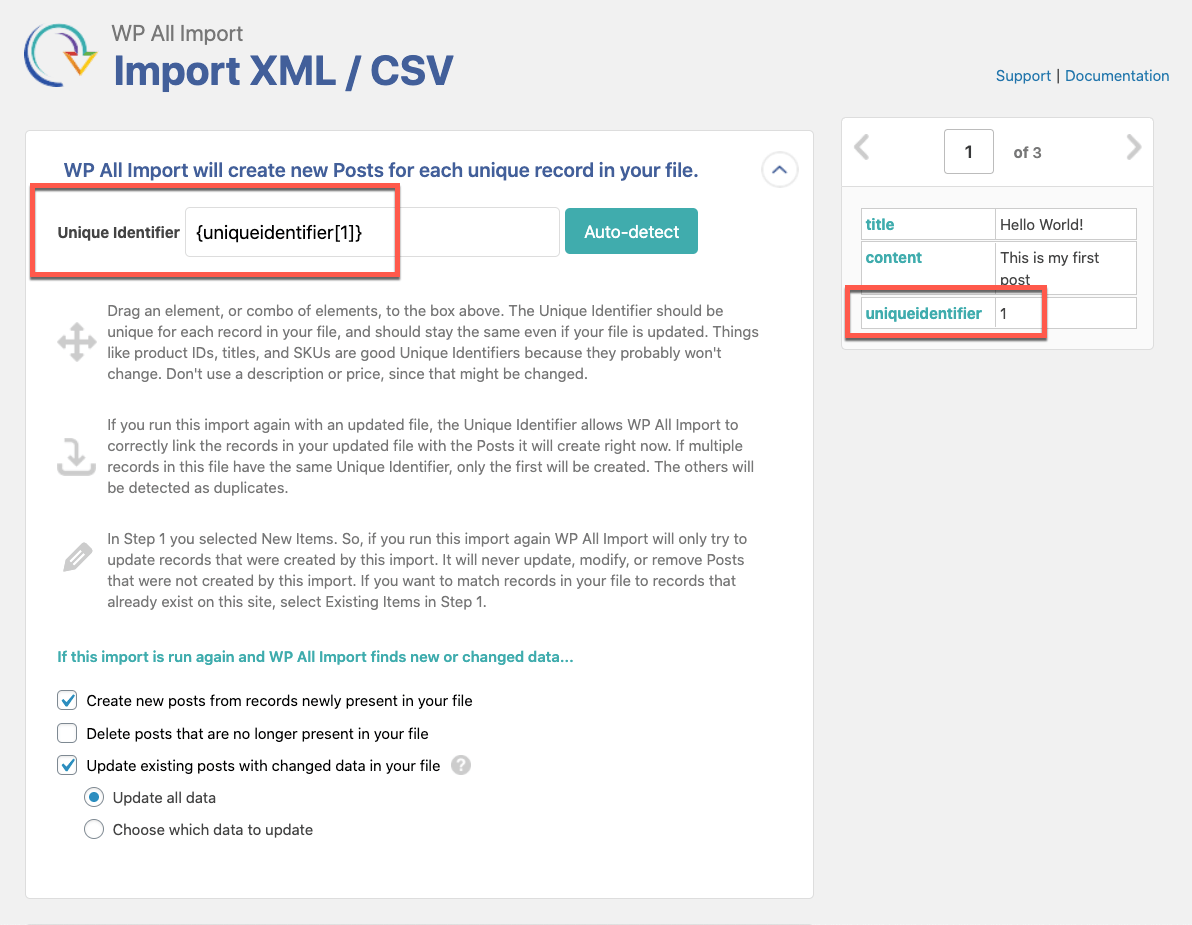
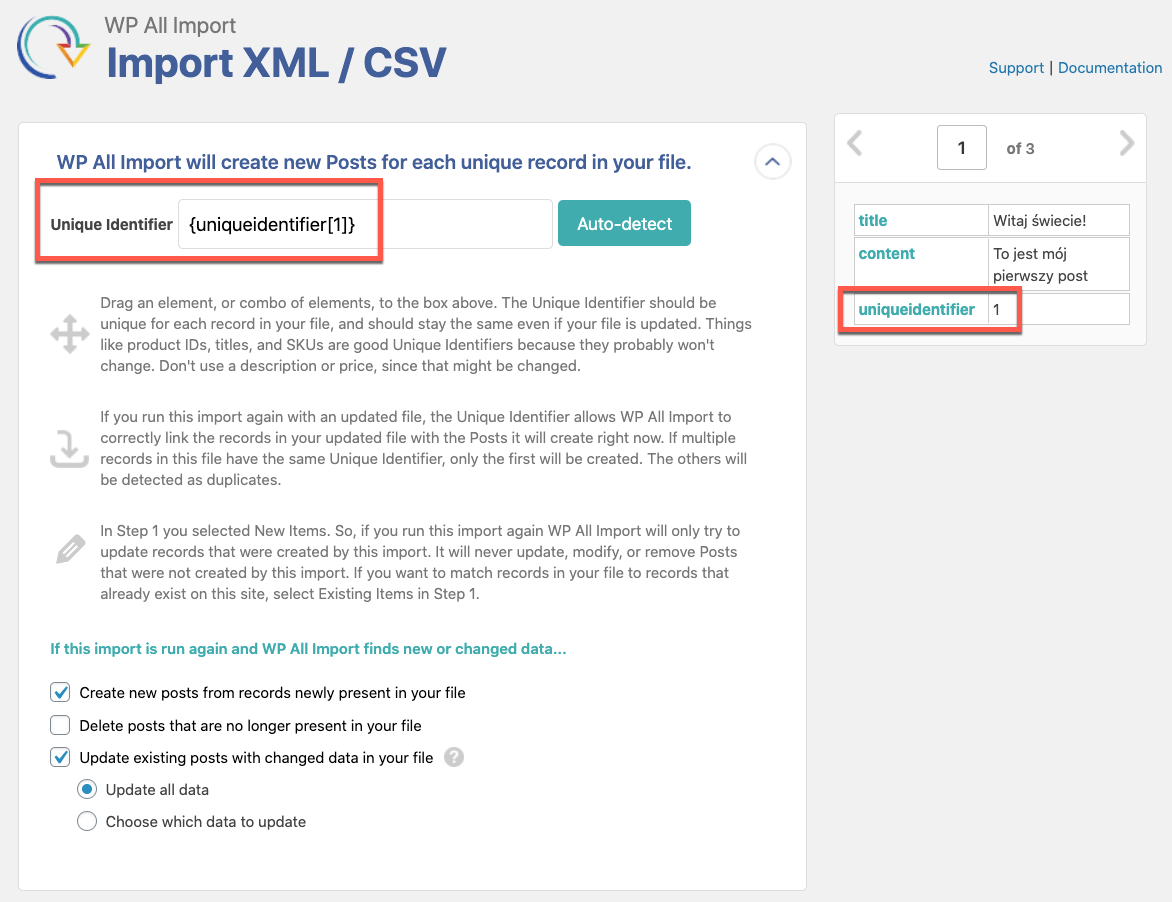
Adding a unique identifier column
When you import the files later, WP All Import will need a way to match the default language posts to their corresponding translations in the other files. You can download the WPML All Import Plugin Addon 2.2.0 by wpml with the gpl license key free and non nulled free or non-crack free latest version file.To do this, you need to specify a unique identifier for each post. Assign an ID number to one of your posts in your default language. Then, use that same ID number for the same post in your secondary language files. By looking at this ID, you can tell which post is the translation of another by finding the same ID number in your files.
For example, in the screenshots above, you can see that, “Hello World!” has a Polish translation of “Witaj świecie!” because they have the same unique identifier.
Create your taxonomies
If you are importing posts with taxonomies (categories, tags, or custom taxonomies), you must create the exact same taxonomies in your WordPress site before importing the post files. This can be done in two ways:
- Create the terms manually and translate them. Make sure the terms that you create in both your default and secondary languages match the terms you use in your CSV files exactly. If you have a lot of terms to translate, you can check our guide on translating all taxonomy terms at once.
- Import the terms using WP All Import. To do this, prepare new CSV files to import the taxonomies and their translations. Add the unique identifier column to all CSV files to link each taxonomy term with its translation. You can follow WP All Import’s guide on importing taxonomies, but be sure to set the import language as described in the section later in this article.
Each time you import posts with taxonomies, you need to create the taxonomy terms first, then import the posts. Once the taxonomy terms and translations exist and match the terms in your CSV file, WP Import will be able to set the correct taxonomy for posts you import.
Matching taxonomy translations after import
As previously stated, we highly recommend creating your taxonomy terms and translations before importing your CSV files. If you do not create your taxonomies before importing your CSV files, your secondary language taxonomy terms will not be connected as translations of the default language terms. You will need to edit each of your translated taxonomy terms to match them with the correct default language taxonomy term.
To do this:
- Go to Posts → Categories (or whichever taxonomy type you are correcting).
- Switch to your secondary language using the language switcher at the top of the page.
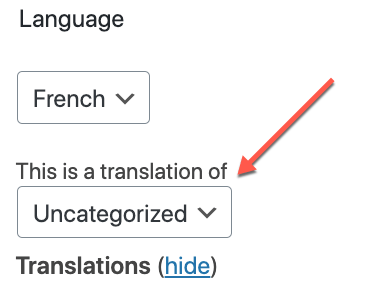
- Edit the taxonomy term you need to fix.
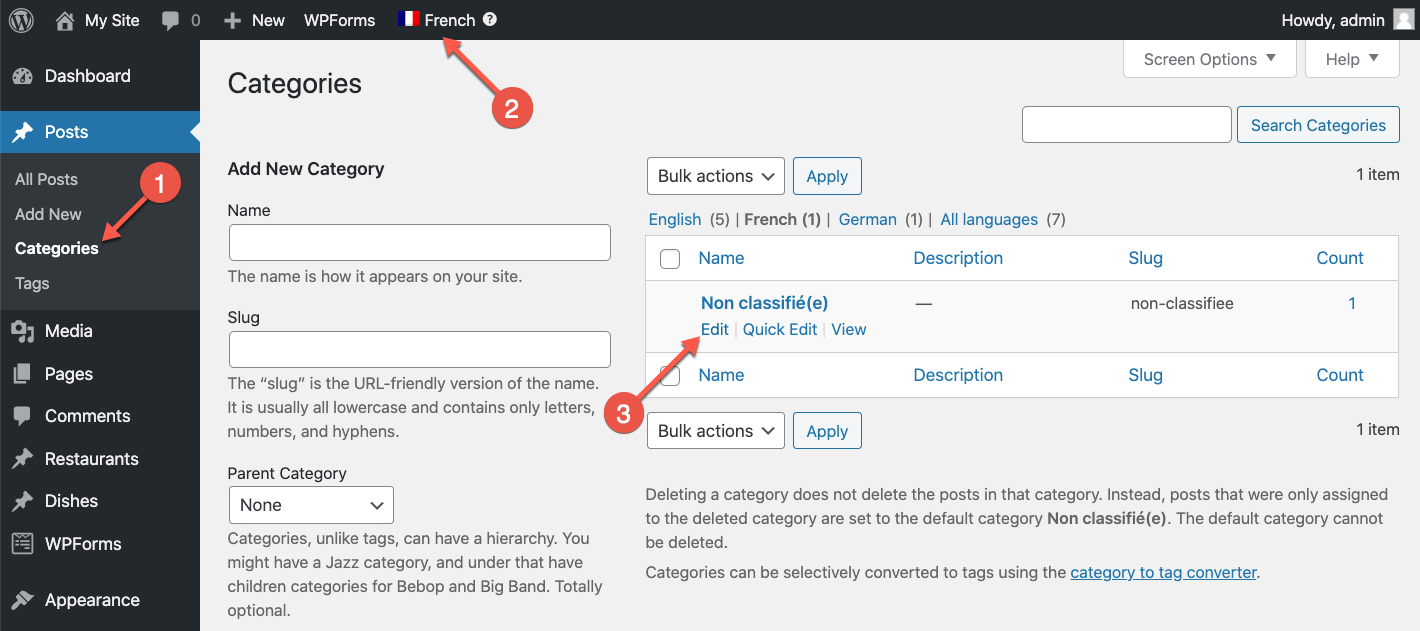
- At the bottom of the page, choose which default language taxonomy term the current term is a translation of.
How to import posts
Once your taxonomies and their translations are in place, you are ready to import your CSV files. Be sure to import your default language files first, followed by your secondary language files. We will summarize the steps below. For more detailed documentation, please see WP All Import’s article on how to import files.
First, import the default language file
To import your default language file:
- Go to WP All Import → New Import, and click Upload a file to upload your default language CSV file. Choose whether you are uploading new or existing items, and what type of element you are importing.
- On the next screen, you can review each row in your CSV file. If it all looks correct, click Continue to Step 3.
- Map your column titles from the right sidebar to the correct fields by dragging and dropping them. Expand the WPML All Import metabox and choose your default language. Then, click Continue to Step 4.

- Map the unique identifier to the correct element in your CSV or XML file. Click Continue to view a summary of your import, then click Confirm & Run Import to import your default language posts.
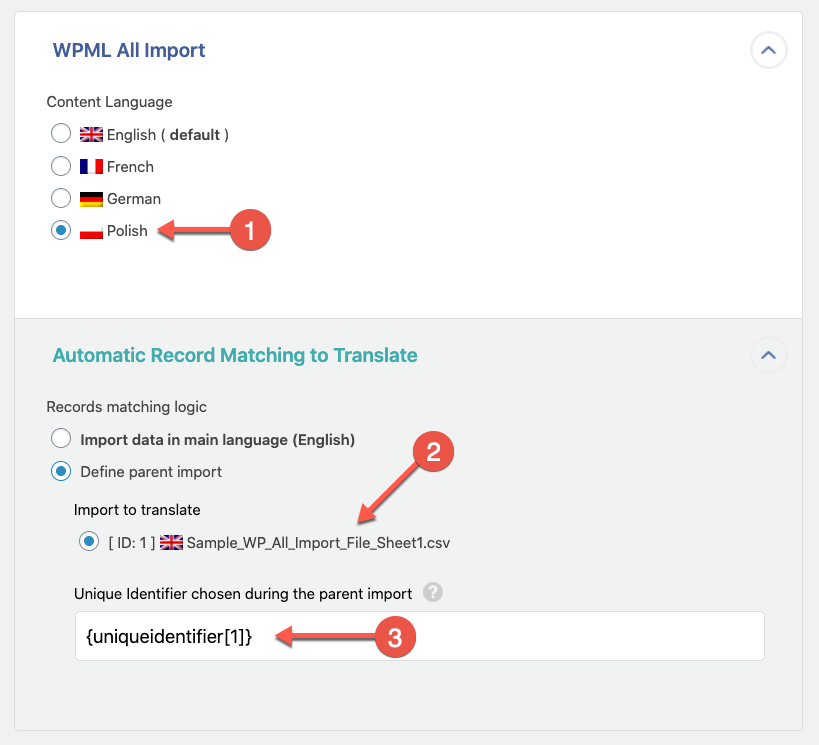
Next, import the secondary language file
Repeat the import process with your secondary language file with a few of exceptions:
- In the WPML All Import metabox, choose the correct secondary language.
- Expand the Automatic Record Matching to Translate section and select the file that you used to import the default language posts.
- Drag the field that you are using as the unique identifier to the Unique Identifier field. This field and the Unique Identifier field on the next screen needs to be the same as the one you chose during the default language import.
This import will create posts in secondary languages and connect them as the translations of the default language.
Adding translations when the default language content already exists on the site
Because WP All Import relies on the unique identifier to connect translated posts with their corresponding default language post, you cannot upload the secondary language file to add translations to pre-existing default language content. If you do this, WP All Import will not know which posts the translations belong to.
To add translations when default language content already exists on the site:
- Export your default language content using WP All Export.
- Edit the newly created CSV to add a column for the unique identifier.
- Import this default language file with the new column, being sure to use the Update option.
Once the default language file has been imported, you can continue with your secondary language file as previously explained.
How to import WooCommerce products
WooCommerce Import Add-On Pro is required for importing simple and variable WooCommerce products. Once you have purchased WP All Import, you can find the link to download WooCommerce Import Add-On Pro on your WP All Import downloads page.
You can import WooCommerce simple products by following the process described above.
If you need to import WooCommerce variable products, there are some additional steps. Follow WP All Import’s tutorial for instructions on how to import variable WooCommmerce products. Don’t forget to add the Unique Identifier column!
You can then import your translations the same way, paying close attention to the extra considerations as outlined in the tutorial. Be sure to create all your product taxonomy terms and translations before importing your CSV files.
How to translate and import product taxonomies
You can create your product taxonomies in the same way you create and translate taxonomies for posts and pages. Once the taxonomies and their translations have been created, you can import your products.
How to manually import products with set prices for other currencies
To import products with manually set prices for other currencies, make sure to set the relevant fields in the WooCommerce Add-On section for the default language import. This includes the regular price and sale price.
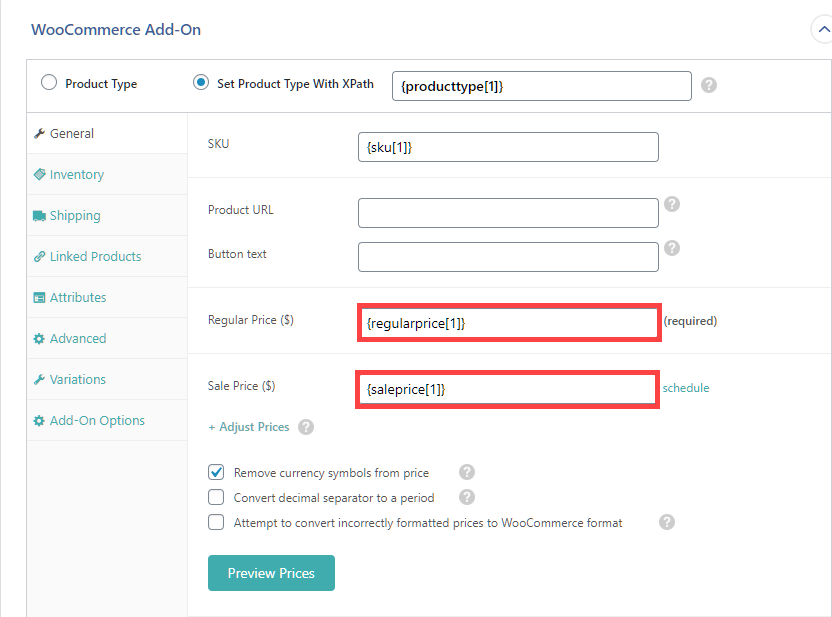
Additionally, you need to add the following custom fields in the default language import in order for the set prices to show correctly on the secondary language products’ pages. In our example, we have manually set prices for products in Euros. Hence, we have added the following custom fields:
_regular_price_EUR_sale_price_EUR_price_EUR_sale_price_dates_to_EUR_sale_price_dates_from_EUR_wcml_schedule_EUR_wcml_custom_prices_status
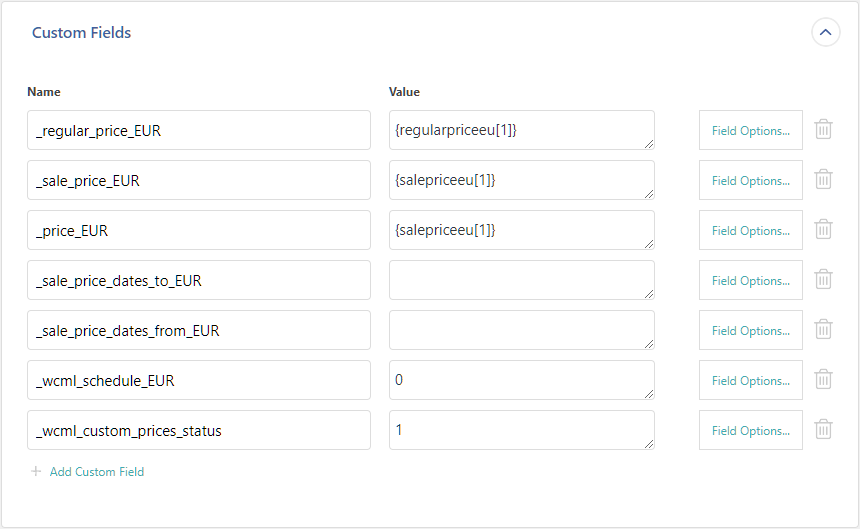
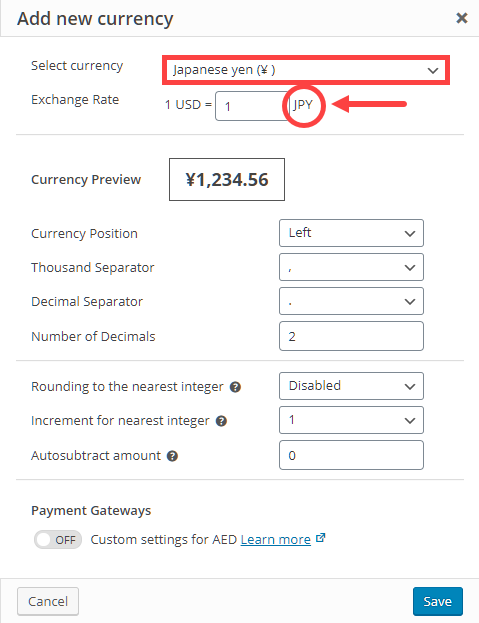
As you may have noticed, some of the custom fields have the suffix _EUR. Depending on the currency you have set prices for, you need to change this suffix to match the currency code. You can get any currency code by navigating to WooCommerce → WooCommerce Multilingual. Go to the Multi-currency tab and click on the Add currency button. There, select the currency to get its code.
If you are importing products in more than one language and they all have manually set prices for all other currencies, make sure to add custom fields associated with all the currency suffixes.
Exporting posts
WPML and WP All Import do not have an option to export posts from a WordPress installation; this is out of scope for these plugins.
We do not recommend using the standard WordPress option to export content to XML files (Tools → Export). You will have to split those files into many (one for each language) and add an XML element with a Translation Group ID. XML files are not easy to edit, so it can be a lengthy process. WPML All Import Plugin Addon 2.2.0
If you want to save a backup of your posts, we recommend using an export plugin like WP CSV Exporter, WP CSV, or WP All Export. These plugins export CSV files, which make it easier to split files per language and add information about the Translation Group ID.
Importing a custom database design into WordPress
Migrating from a custom database with different tables into WordPress can be a challenging task. Fortunately, you can accomplish this using Toolset plugins and WP All Import. Check Toolset’s guide on importing a database into WordPress. The video below illustrates the migration process in details:
Getting help
In case you need help using WPML All Import, visit WPML’s support forum.
OUR FEATURES
☑️Affordable Prices:
Our prices are much lower than developers. You can purchase a premium product at an affordable price!
☑️100% Original Files:
100% clean original files without implemented advertising, viruses, or malicious code.
☑️Frequent Updates:
We offer lifetime updates and we stay tuned and regularly lay out a fresh version of themes and plugins.
☑️Direct Download Links:
You download the product directly from our website without any waiting and advertising!
☑️100% Legal with GPL licensed:
All digital products presented on the website are released under GNU General Public License.
☑️Unlimited Domain Use:
The plugins and themes are GPL licensed so you can use them as often as you like on as many sites as you like.
READ BEFORE PURCHASE
- Before making a purchase, please read the Terms and Conditions & Refund Policy.
- If you have any questions, please first read the FAQ.
- If you haven’t found the answer to your question, please contact us, we will respond asap.
- You can download the product after the purchase by a direct link on your Downloads sections.
- Please note that any digital products presented on the website do not contain malicious code, viruses, or advertising. We buy the original files from the developers. We do not sell any products downloaded from other sites.
UPDATES & SUPPORT
Updates
- We offer frequent updates for one year from the date of purchase. After this period, you have to purchase the item again to receive further updates, we also offer lifetime updates as a second option.
- We regularly update products as soon as we are notified about an update, we go and download it from the author and update it on our site, but In case the current version of the product is not the latest, You can request an update for the product from the form below.
- We send regular emails advising when products have been updated so please be sure to provide an active email address when you sign up.
Support
- Our support team is available 24/7, if you have any questions or need help in installing or configuring digital products purchased on the website, please don’t hesitate to contact us.
- Please note that we are not developers of the provided products, so our technical support capabilities are limited. We do not change product functionality and do not fix developer bugs.
For more information please read FAQ & About Us.
Request This Product Update – [Fill Form]
HOW TO UPGRADE?
How do I upgrade a plugin?
First, install and activate this plugin – Easy Theme and Plugin Upgrades,
then follow the below steps:
- Download the latest zip file for your plugin.
- Log into your WordPress site.
- Go to Plugins > Add New.
- Click the “Upload Plugin” button at the top of the page.
- Select the zip file with the new plugin version to install.
- Click the “Install Now” button.
How do I upgrade a theme?
First, install and activate this plugin – Easy Theme and Plugin Upgrades,
then follow the below steps:
- Download the latest zip file for your theme.
- Log into your WordPress site.
- Go to Appearance > Themes.
- Click the “Add New” button at the top of the page.
- Click the “Upload Theme” button at the top of the page.
- Select the zip file with the new theme version to install.
- Click the “Install Now” button.
How to fix the “style.css missing” error while uploading themes?
A common issue that can occur with users new to installing WordPress themes is a “Broken theme and/or stylesheets missing” error message being displayed when trying to upload or activate the theme.
This is because the theme download package on ThemeForest includes additional files to the theme such as the documentation, license, etc.
To solve this simply unzip the theme package you downloaded from Ansefy GPL and upload the themename.zip file which is included (with the file being the name of the theme).
SUBCRIBE TO US
Do you want to create and manage a high-quality website?
Subscribe & Get Access to All Premium WordPress Themes, Shopify, Magento, Drupal, Opencart, Prestashop, WooCommerce Themes, Modules, Scripts, Add-on, Plugins, Premium Extensions, Premium Themes, Plugins or much more at Affordable Prices, With Original Products, Free Updates & Unlimited Domain Use. Know More
Want to get download this plugin and theme for free. Join and Subscribe immediately with ansefy GPL via sending one email to us.
User Reviews
Be the first to review “WPML All Import Plugin Addon 2.2.0”

₹299.00

There are no reviews yet.